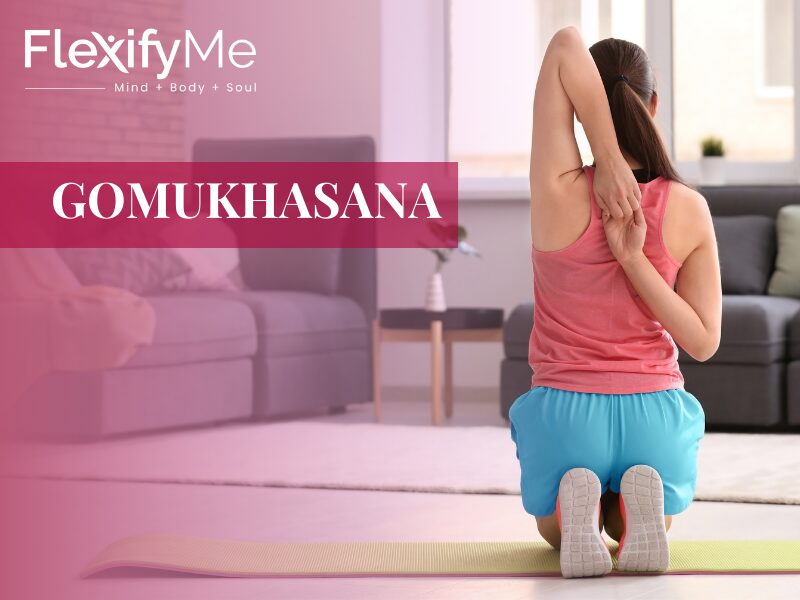
Yoga is essential for feeling energetic and maintaining a healthy lifestyle. Whether it is for concentration, strength, mental well-being, intelligence, or creativity, yoga is indispensable. Gomukhasana, also known as the Cow face pose in yoga, is practised for several health benefits. This is a seated yoga posture in which many body parts are stretched and relaxed periodically to offer flexibility and a supple body.
Ankles, hips, thighs, underarms, shoulders, and many other regions are impacted while you perform this yogic asana. Here is everything you need to know about the Gomukhasana yoga pose.
What is Gomukhasana (Cow Face Pose)?
The name comes from Sanskrit:
- Go = Cow
- Mukha = Face
- Asana = Pose
This is a popular yoga posture in which one intertwines their arms behind their back. Gomukhasana is called so because, while the arms and legs are intertwined, they resemble the shape of a cow’s face. The crossed legs look very similar to those of a Cow face, while the raised hands give the shape of Cow ears. It was the visual representation of the pose that gave it its name.
The best part about this yoga is that you can practise it post-dinner, too. This way, you don’t have to worry about the heavy meal either. If you have prolonged sitting or intense physical activity, Gomukhasana can help relieve body tension.
Benefits of Gomukhasana
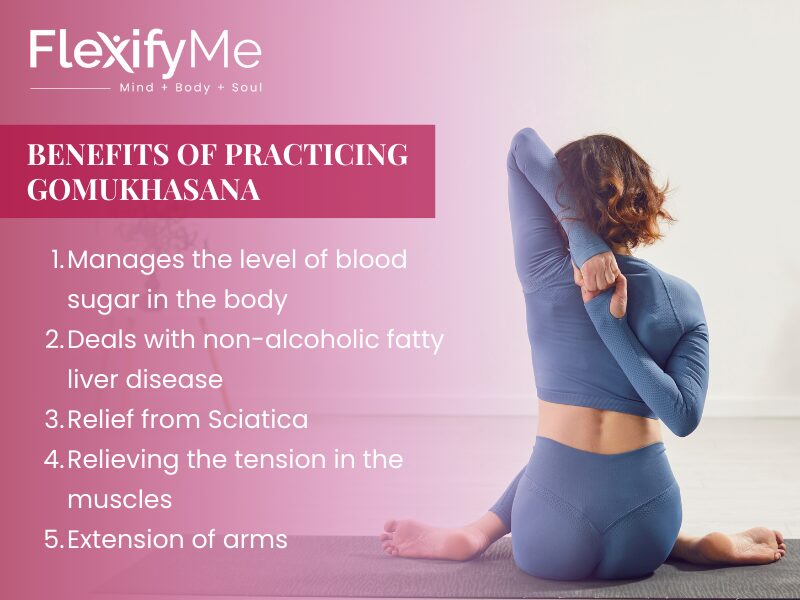
There are several health benefits of Gomukhasana. Vital ones being:
- May help manage blood sugar levels in the body: Some practitioners believe Gomukhasana may support metabolic health and circulation, which may indirectly help overall wellness.
- Deals with non-alcoholic fatty liver disease (NAFLD): The twisted motion of the body creates a massaging effect on the abdominal region as well as the organs here, including the liver.
- Relief from Sciatica: You can get relief from sciatica by stretching in this posture and then gradually relaxing. The lower hip, buttock, and chest feel relaxed and relieved gradually.
- Relieving muscle tension: You can relieve the tension and stiffness in your chest and neck by practising this yoga posture.
- Aids in better kidney function: The deep stretches that you experience in the hip region are effective in increasing the functionality of the kidneys. This also reduces the physical manifestation of stress and pain in the body.
- Enhances flexibility in the body: If you regularly indulge in practising Gomukhasana, you will surely benefit in terms of overall health and flexibility of your body.
How to Do Gomukhasana Step-by-Step
If you engage in yoga every day, then you should include Gomukhasana in your routine for additional benefits. Whether it is for mental clarity, flexibility, relaxation, or better focus you are aiming for, knowing how to do Gomukhasana correctly can help you reap all these benefits.
- Start by sitting on the floor. After settling down, stretch out your legs in front of you.
- Then bend your knees so your legs are closer to your body. However, throughout the process, make sure your legs are planted firmly into the ground so that the stretching is effective.
- It’s time to slide your left leg under your right thigh beside the right hip.
- Do the same with your right leg, which is now crossed over your left thigh. This stacks your right knee over your left.
- You must try to align both your knees as closely as possible. Ensure that one is present over the other.
- Then, you can flex your feet so that your ankles are protected from getting twisted or sprained. This way, you can distribute your body weight across both hips instead of landing it on your legs.
- Now it’s time for the hands. Extend and stretch them at the level of your shoulders, running them parallel to the ground.
- Bend your elbow and reach behind your back with your opposite hand. The palms should face away from the body.
- Then you need to clasp your fingers as close as you can. Your spine should be tall, and your chest lifted as you make these arrangements. Do not round up or hunch forward during the process.
- As a beginner, you can try holding this posture for up to 30 seconds, then gradually increase the duration to 1 full minute. Keep your gaze steady and continue to breathe deeply.
- Once you are ready to unwind, gently lower your arms and legs, then return to your initial seated position.
- Repeat the process a few times in the opposite direction before you finish it.
5 Variations For Every Level
You don’t need to do the “full expression” to get the benefit. These variations of the Gomukhasana yoga pose let you target what your body actually needs today.
Gomukhasana Arms Only

If your hips are unhappy with the leg stack, you can still work your shoulders.
- Sit comfortably (cross-legged, on a chair, or kneeling).
- Bring one arm up and the other behind, as described above.
- Use a strap if needed.
- Keep ribs in and spine long.
This is great on days when you want upper-body mobility without deep hip intensity.
Seated On A Yoga Block
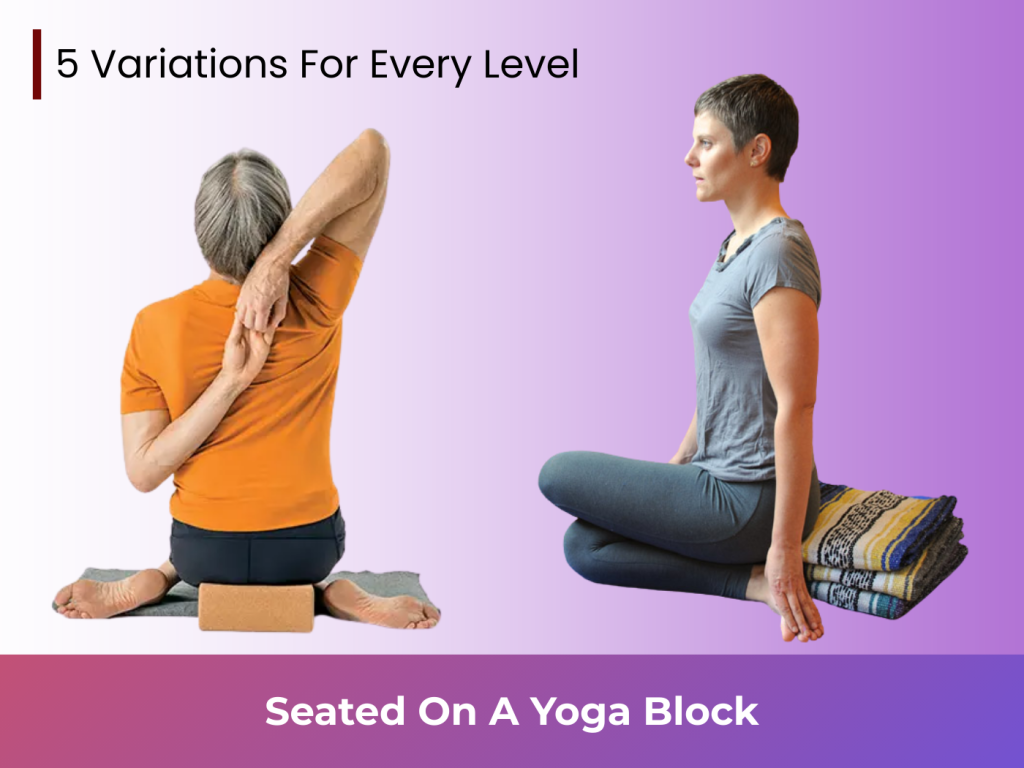
If your hips feel tight or your lower back rounds, elevate your seat.
- Sit on a block or a folded blanket.
- Stack the legs as best you can without forcing.
- Keep the pelvis upright and the spine tall.
This often turns the pose from “impossible” into “workable,” immediately.
Strap-Assisted Gomukhasana
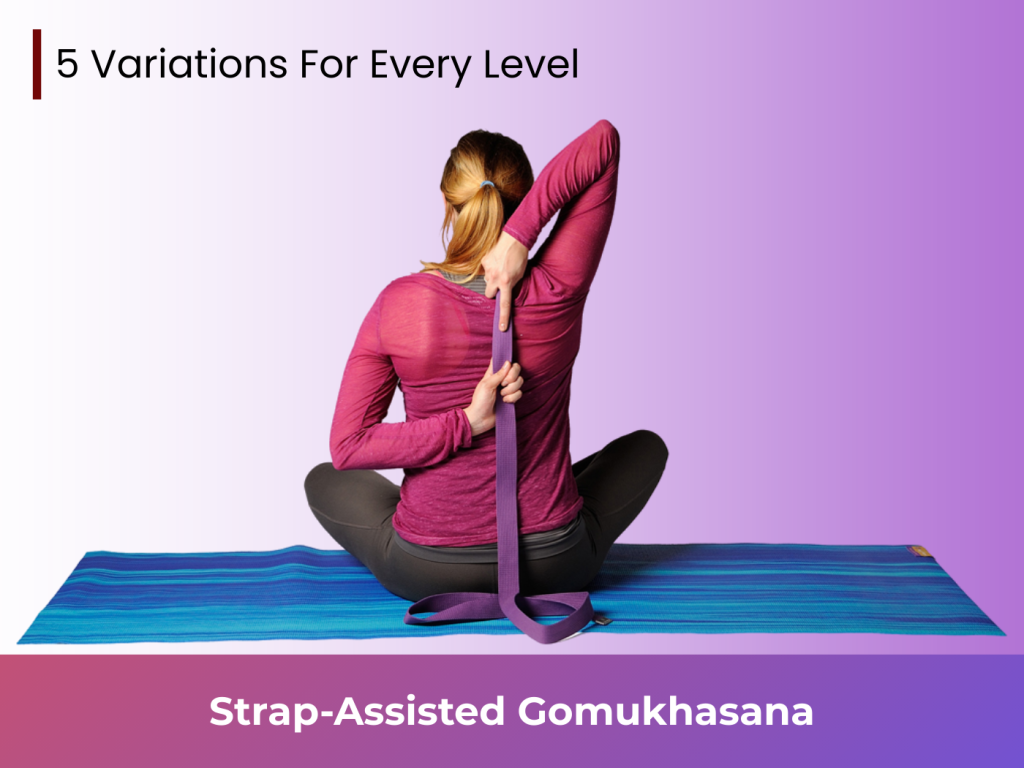
If your hands don’t meet behind your back, use a strap, belt, or towel.
- Hold the strap in the top hand and reach the bottom hand up to grab it.
- Walk the hands closer over time, without yanking.
- Keep your top elbow pointing up (not flaring sideways too much).
This is the smartest way to build shoulder range safely and steadily.
Chair Gomukhasana
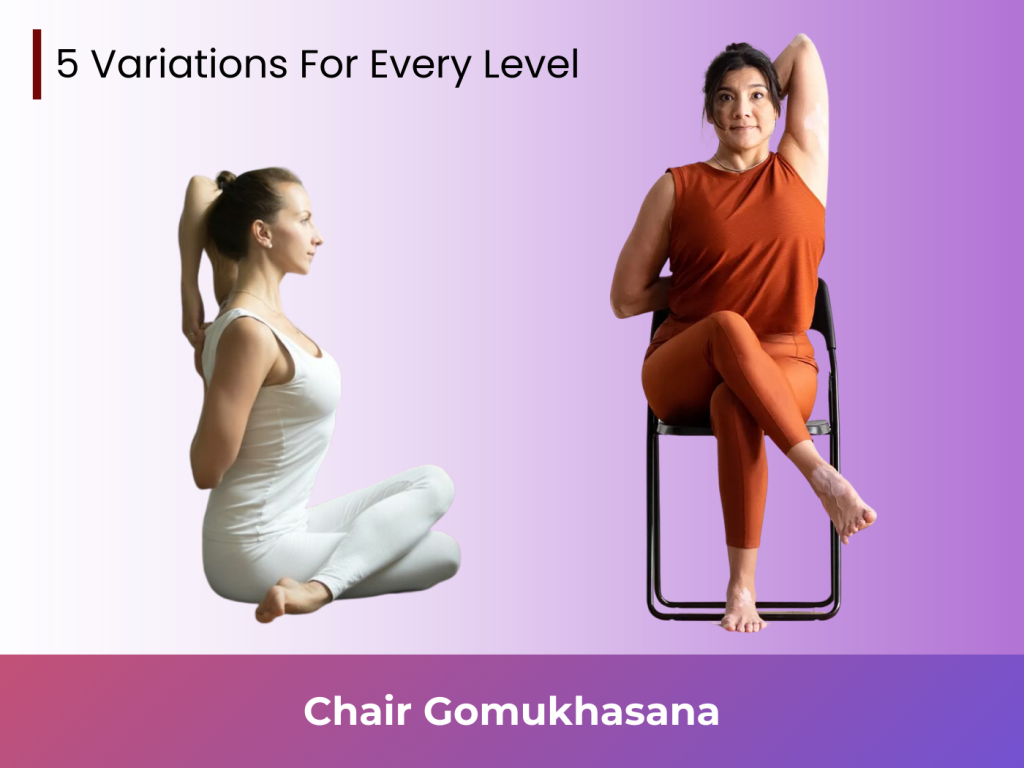
Perfect if sitting on the floor strains your knees, hips, or lower back.
- Sit tall on a chair.
- Cross one thigh over the other (or simply keep both feet grounded if crossing is too much).
- Do the arm position with or without a strap.
You still get the shoulder opening and posture benefits, with a more accessible base.
Supine Gomukhasana Legs
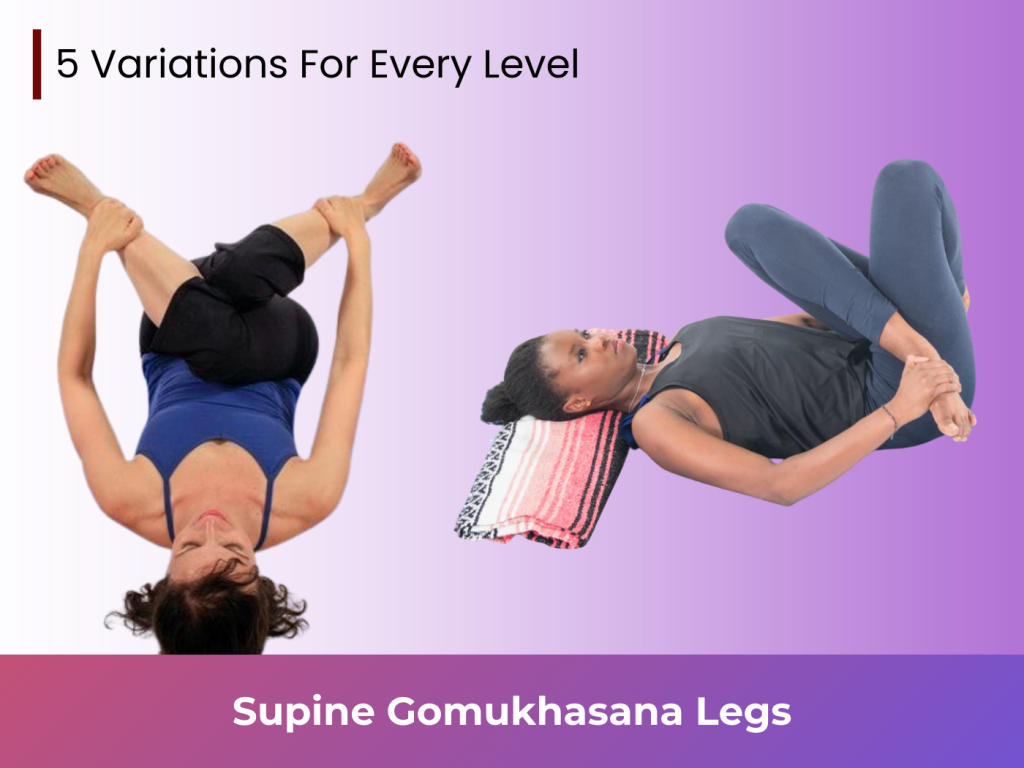
If you want to explore the leg shape without fighting gravity, try it lying down.
- Lie on your back.
- Cross the knees into the “stack” shape as best you can.
- Option: Hold the outer edges of your feet or simply rest your legs.
- Breathe and keep your lower back comfortable.
This variation is surprisingly effective for the hips, especially if you tend to tense up while seated.
Warm-up Exercises You Can Do Before Gomukhasana
Introduce these warm-up poses to your regular yoga schedule first and then move on to Gomukhasana yoga. Incorporating a quick warm-up session is always helpful to prevent any unwanted pains and aches while stretching.
Bound Angle Pose
In this pose, you need to sit on the floor first. Press your soles to the ground, and your knees need to face the sides. Use your hands to hold onto your feet. Then, you can elongate your spine as you relax and feel the rhythm. Allow your knees to be pressed against the ground. This pose will help you to open up your knees and thighs. It will help to create a stretch in the inner and outer thighs as well. Later on, when you are practising Gomukhasana, your body will already be in a relaxed state.
Sun Salutation or Surya Namaskar
You can easily do 10 rounds of sun salutation before you begin. This helps you to open up your arms, lower back, and shoulders. The sequence of movement is then coordinated with deep breathing as well. This helps to prepare the body for stretches and muscle extensions.
Bow Pose (Dhanurasana)
First, lie down on your stomach and bend your knees. Then, you can bring your hips towards your buttocks. At this point, you need to reach out. Then, hold onto your ankles. Your chest, shoulder, and legs will be stretched with the aid of this exercise, making it easier for you to practice Gomukhasana.
Gomukhasana Precautions You Must Know
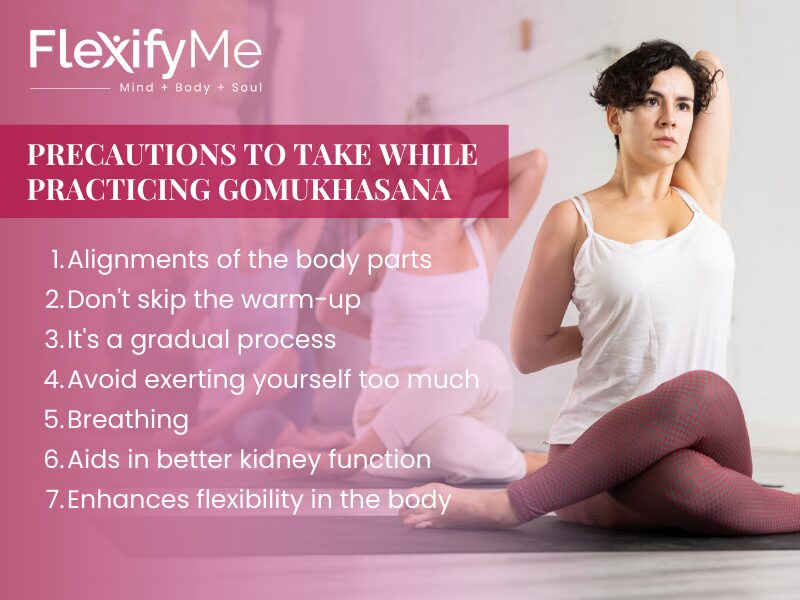
While practising Gomukhasana at home, you must take a couple of precautions. Avoid pulling a muscle or spraining an ankle by following these simple tips and safety measures.
- Avoid forcing the stretch. Move only within a comfortable range to prevent strain in the shoulders, hips, or knees.
- Warm-up is essential to prepare your body for the intensity of the stretch.
- Listen to your body. Your body tells you how far you can conduct the pose without causing any detrimental effects or stress. Do not force your body into a position where it feels uncomfortable.
- Practice steady breathing while performing this asana. Do not hold back your breath.
- Gomukhasana rewards patience. You cannot gain expertise in the asana the very first time. Practising and being patient are the keys to perfecting this yoga posture.
Want to reap the astonishing benefits of yoga? Flexify Me has got your back. With several yoga experts on the team, we can provide the exact plan you need to implement in your life. Book a free consultation and get started with a holistic health journey!
Book your FREE consultation today and take the first step towards a stronger, calmer, and healthier you with Flexify Me’s online yoga classes!
Conclusion
Gomukhasana, or Cow Face Pose, is a beneficial yoga posture. It helps improve flexibility, posture, and overall body awareness. With regular and mindful practice, it may help release tension in the shoulders, hips, chest, and back while supporting relaxation and mobility.
Whether you are practising Gomukhasana to improve flexibility, ease muscle stiffness, or enhance your yoga routine, it is important to move gradually and maintain proper alignment throughout the pose. Beginners can use props or modifications to make the posture more comfortable and accessible.
Practising consistently, while listening to your body and following the necessary precautions, can help you experience the benefits of Gomukhasana safely and effectively.
Frequently Asked Questions About Gomukhasana
1. What is Gomukhasana?
A. Gomukhasana is a yoga pose where the legs are crossed in a way that resembles a cow’s face. In this pose, one knee is stacked over the other, and hands are clasped behind the back.
2. What benefits does the Gomukhanasa (Cow Face Pose) provide?
A. Cow face pose helps improve flexibility in the hips, shoulders, and chest. It relieves stiffness in the back and neck, improves posture, and promotes relaxation by reducing muscle tension.
3. How to do the cow face pose correctly?
A. Here are the steps to do Gomukhasana correctly:
- Sit straight with your legs extended.
- Bend the left knee and place it under the right leg.
- Sit such that the right knee is stacked over the left knee.
- Now raise your right arm and bend it behind your head.
- Bring your left arm behind your back, and try to clasp your fingers.
- Keep your back straight and be in the pose for a few seconds, then change sides.
4. What to do if we are not able to clasp our hands?
A. If you are not able to clasp your hands, you can use a strap or towel between your hands. Initially, focus on keeping your chest open and your back straight rather than forcing your fingers to join.
5. Is the Gomukhasana good for people with frozen shoulder or shoulder pain?
A. Yes, Gomukhasana is good for mild stiffness, as it stretches the shoulders. However, it is not always suitable for people with frozen shoulder or active shoulder pain.
6. Is Gomukhasana easy for beginners?
A. Yes, Gomukhasana is considered a beginner to intermediate yoga pose. If you find it challenging in the beginning, you can use a prop like a yoga strap or a towel to make the pose easy.
7. What are the mistakes to avoid in the cow face pose?
A. Some mistakes to avoid in the cow face pose are:
- Forcing your hands to clasp.
- Slouching your back.
- Sitting unevenly on the hips.
- Holding the pose for too long.
- Holding your breath during the pose.
8. How long should one hold Gomukhasan?
A. In the beginning, hold the pose for 20-30 seconds. Once you get familiar, increase it for 1 minute.
9. What muscles are used in Gomukhansana?
A. Gomukhasana engages chest, shoulder muscles, upper arms, triceps, hips and glutes. It also stretches thighs, outer hips, back muscles and spine-supporting muscles.
10. Does the cow face pose help release emotions?
A. Yes, the cow face pose may help promote emotional release. It opens the chest, shoulders, and hips, the areas where tension is often held in the body. Many people feel calmer and less stressed after practising the pose. should be).

