Bakasana is one of those yoga poses that gets people curious. The moment they see someone balancing on their hands with both feet off the floor, the reaction is usually the same: ” That looks impossible. Or impressive. Sometimes both.
The funny thing is, Bakasana is not only about arm strength. That is the first surprise. Yes, the arms work. The wrists work. The core definitely has something to say about it, too. But the pose is also about balance, focus, body awareness, and learning how to trust your own weight without panicking halfway through.
That is why beginners often struggle with it at first. Not because they are weak, necessarily, but because the brain has a strong opinion about leaning forward while your face is heading toward the mat.
Still, that is part of the process. Bakasana teaches patience in a very direct way. You cannot bully your way into it. You cannot rush it too much either. The pose usually starts to come together when the body learns to organise itself properly, and the mind stops treating the forward shift as a disaster.
What is the Bakasana Yoga Pose
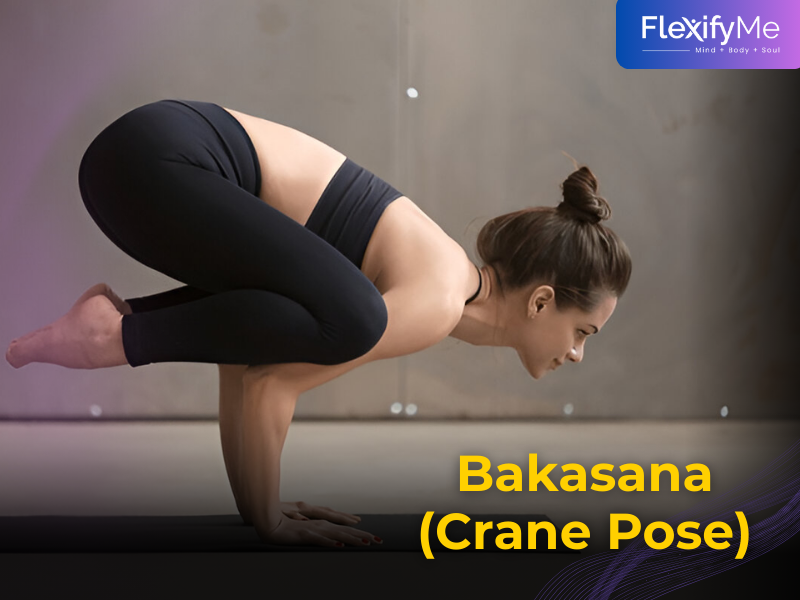
Bakasana is a classic arm balance in yoga where the body is supported on the hands while the knees rest high on the upper arms and the feet lift off the floor. It is often called Crane Pose, though many people casually mix it up with Crow Pose. More on that in a bit, because yes, there is a difference.
In the full shape, the elbows stay fairly straight or only slightly bent, the core stays active, and the body balances forward with control. The pose asks for a combination of upper-body strength, abdominal engagement, hip mobility, and concentration. That is why it often becomes a milestone pose for many people. It feels like a little breakthrough when it finally clicks.
From the outside, Bakasana looks compact. Almost neat. On the inside, though, it is a full conversation between the wrists, shoulders, belly, inner thighs, and brain. There is a lot happening.
It is also a pose that exposes hesitation. If the weight stays too far back, the feet never lift. If the body throws itself too far forward without control, the mat meets the face faster than anyone wanted.
So yes, technique matters here.
How to Do Bakasana Step by Step
Bakasana becomes much more approachable when broken down properly. Trying to jump into it all at once usually leads to wobbling, overthinking, or both.
Here is a step-by-step way to work into it:
1. Start in a squat
Come into a low squat with your feet a little apart. If the heels do not comfortably rest on the floor, that is okay. Many people balance on the balls of their feet here.
2. Place your hands on the mat
Place your hands flat on the ground in front of you, keeping them roughly shoulder-width apart. Spread the fingers wide. This helps create a stronger base and makes the wrists feel more supported.
3. Bend the elbows slightly
Do not lock the arms stiff right away. A small bend can help during setup, especially for beginners. The elbows should point back rather than winging out.
4. Lift the hips
Raise the hips slightly and lean forward so the knees can come high onto the backs of the upper arms. Some people place their knees closer to their armpits. Others find a lower position more stable at first. Both can work while learning.
5. Shift your weight forward
This is the real moment. Lean your chest forward and transfer weight into your hands. Not by jumping. Not by flinging. Just a gradual, committed shift.
6. Lift one foot, then the other
Start by lifting one foot off the floor and then the other. Or lift both together if the balance feels ready. Keep the gaze slightly forward, not straight down. Looking down tends to send the body backwards.
7. Engage the core
Draw the belly in and keep the body compact. Think of hugging inward rather than collapsing into the shoulders.
8. Hold and breathe
Stay for a few breaths if possible. Even two seconds count when you are learning. Truly.
9. Come down gently
Lower one foot and then the other. Rest in a squat or Child’s Pose for a moment.
A good beginner trick is to place a folded blanket or cushion in front of the face. Not because failure is expected, but because the body relaxes more when it knows a soft landing is available.
10 Benefits of Bakasana
Bakasana gets attention because it looks advanced, but the real value of the pose is in what it teaches and builds over time.
1. It builds arm strength
The hands, wrists, forearms, and upper arms all work in this pose. You feel that quite quickly.
2. It strengthens the shoulders
The shoulders need to stabilise and support body weight without collapsing. That makes Bakasana a strong upper-body conditioning pose.
3. It activates the core
This one is huge. The core has to stay awake the whole time. Without that, the pose falls apart very fast.
4. It improves balance
Bakasana teaches balance in a very specific way. It is not about standing still. It is about learning how to manage weight shift and the centre of gravity.
5. It sharpens concentration
You cannot really drift off mentally in Crane Pose. The focus has to be there. That can be frustrating at first, but also strangely refreshing.
6. It builds body awareness
The pose teaches where the hands press, where the knees connect, how far the chest needs to move, and when the weight is too far back or too far forward.
7. It may improve confidence
There is something about learning an arm balance that changes how people see their own ability. The first successful lift often feels bigger than the pose itself.
8. It strengthens the wrists gradually
When practised with a good setup and proper preparation, Bakasana can help build wrist resilience over time. Slowly is the keyword here.
9. It encourages control over momentum
Many beginners want to “hop” into the pose. Bakasana teaches a calmer way. It rewards control more than speed.
10. It makes other arm balances easier to understand
Once Bakasana starts making sense, many other balancing poses feel less mysterious. It becomes a foundation.
Preparatory Poses for Bakasana
Trying Bakasana without warming up is usually not the smartest move. The wrists need preparation, the hips need opening, and the core needs to wake up a bit.
A few poses help a lot:
Malasana (Garland Pose)
This deep squat helps prepare the hips and brings the body into a shape that feels close to the Bakasana setup.
Cat-Cow
A simple but useful warm-up. It gets the spine moving and helps bring awareness to the shoulders and core.
Plank Pose
Plank pose builds shoulder and core strength, both of which are important for Crane Pose.
Chaturanga Prep
Even if full Chaturanga is not part of the practice, the prep work helps strengthen the arms and teach better shoulder control.
Boat Pose
Boat Pose wakes up the abdominal muscles and helps create the compact feeling needed in Bakasana.
Standing Forward Fold
This helps loosen the back body and gives the body a more folded, inward shape.
Happy Baby or Hip Openers
Tight hips can make it harder to bring the knees high enough on the arms, so a bit of opening work helps.
Honestly, even a few rounds of simply leaning forward from a squat, hands on the mat, can be a useful prep drill. It teaches the balance point before the full pose arrives.
Common Mistakes in Bakasana
Bakasana has a few very common problems, especially for beginners. Most of them come from fear, rushing, or trying to muscle through it without enough setup.
Keeping the weight too far back
This is probably the biggest one. If the chest does not move forward enough, the feet will stay glued to the floor. The body has to trust the lean.
Looking straight down
The gaze matters. Looking too far down often shifts the weight backwards. Looking slightly forward helps the pose balance more naturally.
Jumping instead of shifting
A lot of people try to spring into Bakasana. It can work sometimes, sure, but it usually creates more chaos than control.
Letting the elbows splay out
When the elbows go wide, the base becomes unstable. Keeping them more in line creates better support.
Collapsing into the shoulders
The shoulders should stay active. Sinking down heavily makes the pose harder and less safe.
Forgetting the core
If the belly goes soft and the body loses its compact shape, the balance gets much harder to hold.
Placing the knees too low
If the knees sit too low on the arms, some people struggle to get enough lift. Bringing them higher can help, depending on body proportions.
Holding the breath
This happens all the time. People finally lift and then stop breathing, like the pose is a secret they might scare away.
Bakasana vs Crow Pose
This is where things get a bit funny, because in many yoga classes and online tutorials, Bakasana and Crow Pose are treated like the same pose. They are related, but technically they are not identical.
In Crow Pose, which is often linked to Kakasana, the elbows are more bent, and the knees rest on the backs of the upper arms while the body stays in a more tucked shape. It tends to feel more accessible for beginners.
In Bakasana, or Crane Pose, the arms are straighter, and the shape is a little more lifted and extended through the upper body. That can make it feel lighter once you know it, but less obvious at the beginning.
That said, language around these poses is inconsistent in the yoga world. Some teachers call the bent-arm version Bakasana anyway. Others separate them strictly. So if different classes use different names, it doesn’t necessarily mean anyone is wrong. It is just one of those yoga-naming situations that got a bit messy over time.
For most beginners, starting with the more tucked, bent-arm version makes sense. Then, over time, it can evolve toward the straighter-arm expression.
Variations of Bakasana
Variations make a huge difference with this pose. They give the body a way in.
Toe-tap Bakasana
Instead of fully lifting both feet, keep one or both toes lightly touching the floor while leaning forward and finding the balance point. This is a great first step.
One-foot lift
Lift one foot off the mat while the other stays down. Then switch sides. This helps build confidence without going all in.
Block-supported Bakasana
Place the feet on a block before leaning forward. This reduces the distance between the floor and the body, making the transition feel less intimidating.
Bent-arm Crow variation
This is often the version beginners learn first. The elbows stay bent, and the body remains more compact.
Straight-arm Crane
This is the more classic Bakasana expression, with straighter arms and a stronger lift through the body.
Side-to-side weight shift drills
These are not always presented as a formal variation, but they help. From a squat with the hands down, lean into the hands and shift weight without lifting fully. Very useful for learning.
Bakasana with a bolster in front
This is less about changing the pose and more about changing the level of fear. A cushion in front can make the practice feel much safer.
Muscles Worked in Bakasana
Bakasana may look like an arm balance, but it is really a whole-body effort.
The main muscles working include the shoulders, triceps, forearms, wrists, abdominals, hip flexors, and upper back. The inner thighs also help by hugging inward, and the spinal muscles work to hold the shape together.
More specifically, the pose uses:
- Deltoids in the shoulders
- Triceps are in the back of the arms
- Forearm and wrist stabilisers
- Rectus abdominis and deeper core muscles
- Serratus anterior for shoulder support
- Hip flexors
- Inner thigh muscles for leg engagement
- Upper back muscles keep the body lifted
That is why the pose can feel tiring so fast. It is not just one muscle group giving effort. It is a coordinated team job.
Beginner Tips for Learning Bakasana
Since this pose brings out nerves in a lot of people, beginner tips matter more than usual.
- Start with a cushion in front of you. Seriously. It reduces fear immediately.
- Practise the forward lean without worrying about the full lift. That balance point is half the lesson.
- Strengthen the wrists gradually. Do not go from zero to ten minutes of arm balancing and expect the wrists to be thrilled.
- Keep the elbows drawing back, not out to the sides.
- Use the breath. When people panic, the breath disappears first.
- Do not compare your shape too much with someone else’s. Arm balances depend a lot on proportions, mobility, and confidence, not just “fitness.”
And celebrate the tiny wins. One foot lifting is progress. Hovering for one breath is progress. Learning how not to face-plant is also progress, honestly.
Looking to improve strength, flexibility, and balance? Our online yoga classes are tailored to help you master poses like Bakasana with proper alignment and expert support.
Conclusion
Bakasana is one of those poses that can look intimidating until the body begins to understand it. Then, suddenly, it feels less like a stunt and more like a conversation among balance, strength, and timing.
It asks for effort, yes, but not reckless effort. It asks for commitment, not rushing. And for beginners especially, it asks for the willingness to wobble, try again, and trust that a pose does not have to be perfect to be worth practising.
That is probably the real lesson in it.
Not just learning how to balance on the hands, but learning how to stay steady in the awkward, uncertain stage before the balance arrives.
Frequently Asked Questions for Bakasana (Crane Pose)
1. Why can’t I balance in Bakasana?
Most people struggle because they don’t shift their weight forward enough. Fear of falling, weak core engagement, and improper hand placement can also affect balance.
2. Why won’t my feet lift in Bakasana?
If your feet aren’t lifting, your weight is likely too far back. Lean forward, engage your core, and place your knees higher on your arms for better support.
3. Why do my wrists hurt in Bakasana?
Wrist pain usually happens due to poor alignment or lack of warm-up. Distribute weight evenly across your palms and fingers, and build wrist strength gradually.
4. How can I overcome fear in Bakasana?
Use a cushion or block in front of you and practice slow weight shifts. This helps reduce fear and builds confidence over time.
5. Is Bakasana good for core strength?
Yes, Bakasana requires strong core engagement to lift and hold the body, making it an effective pose for strengthening abdominal muscles.
6. Can Bakasana help in weight loss?
Bakasana supports weight loss by building strength and boosting metabolism, especially when combined with a consistent yoga routine and balanced diet.
7. Which is easier, Crow Pose or Bakasana?
Crow Pose is generally easier because it involves bent arms and a more compact shape, making it more beginner-friendly than Bakasana.
8. Is Bakasana the same as Crow Pose?
No, Bakasana usually involves straighter arms, while Crow Pose (Kakasana) uses bent elbows and offers more stability for beginners.
9. Is Bakasana safe for beginners?
Yes, it is safe when practiced with proper technique, warm-up, and gradual progression. Using props can also reduce the risk of injury.
10. How can I protect my wrists in Bakasana?
Press evenly through your palms and fingers, warm up your wrists before practice, and avoid putting excessive pressure without proper strength.