Table of Contents
If you are looking for an exercise that involves both your core and back muscles, then the reverse plank exercise is what you should try out. Such a posture is highly effective for all age groups and involves muscles from different parts of your body. There are several benefits of performing a reverse plank. By targeting the posterior muscles and the ones in your abdominal region, you can effectively stabilise the core and gain flexibility.
Included in most of the yoga workouts, this kind of plank position will require ample space. This helps you to extend your body and stretch without any hindrance in the way. Conducting this exercise is best on the floor with a yoga mat laid out. However, sometimes, one might slip on the surface, which makes them choose bare ground for support. Here’s how you can conduct the yoga posture.
How to Do a Reverse Plank?
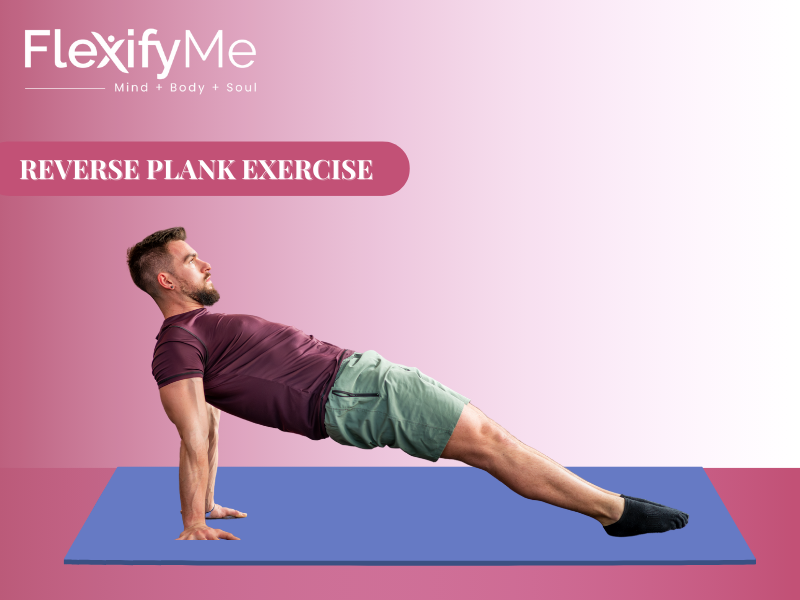
A reverse plank exercise is a bodyweight posture that targets a group of muscles in the body. You need to lie down on your back to perform the reverse plank. The hands are present behind your hip while the body is lifted off the ground in this posture. Continue to balance until your lower and upper bodies are in the air and aligned at the same angle. The core muscles are heavily engaged in a reverse plank. Here are some quick steps to perform a reverse plank at home:
- First, you need to sit on the floor with your legs stretched. Place your hands behind your hip.
- Make sure that your fingers face your hips, with the fingertips pointing forward.
- Rotate your shoulders outwards such that your lats are engaged.
- Now, slightly move at an angle such that your pelvis is tucked inside.
- At this point, you need to squeeze your glutes and quads. Make sure that your chin remains tucked throughout the posture.
- As you maintain your alignment, carefully lift your hips above the ground.
- Make sure that your body forms a straight line at the shoulders and ankles.
- In the meantime, your heels should be in contact with the ground while your toes point forward.
- Through the this exercise, your core remains engaged so that the body tension is maintained intact. Hold the posture for a few seconds before releasing.
Ideally, you can perform the steps in two to three sets of 30-60 seconds every day. However, your choice of sets and duration of the exercise depends on your ability to maintain the posture and the strength of the core muscles.
Reverse Plank Exercise Benefits
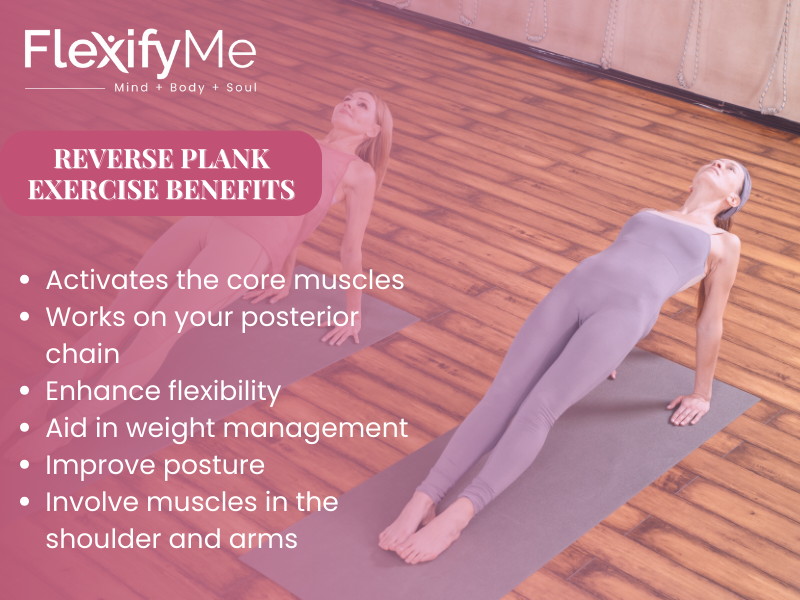
- Activates the core muscles: A reverse plank is particularly effective in opening up the muscles of the abdominal region, addressing stiffness and cramps. Rectus abdominis, or the six pack, becomes flabby and reduces in strength due to a lack of exercise. With reverse planks, one can lose weight as well as build a stronger core.
- Works on your posterior chain: Reverse planks also focus on the posterior muscles that include the hamstrings, glutes, and almost all the muscles in the lower back.
- No need for any equipment: The best part about this exercise is that it is one of those bodyweight management positions which do not require any equipment or props for additional support. Hence, it is very easy to practice such a posture at home.
- Enhance flexibility: The Flexibility of the shoulders and hip flexor is further enhanced with regular practice of reverse planks.
- Aid in weight management: By involving multiple muscle groups, the back plank exercise contributes to burning calories and reducing body weight.
- Improve posture: Reverse planks are particularly helpful in enhancing the flexibility in the back muscles. This offers better posture and prevents unnecessary cramps.
- Involve muscles in the shoulder and arms: Through engaging the muscles in the shoulders and arms, overall upper body strength is enhanced by practising reverse plank.
Reverse Plank for Beginners
Reverse planks or similar body weight exercises help to strengthen the core and aid in weight management. The exercise is modified for beginners with shorter durations so they do not feel excess strain on the back muscles. Here is a short beginner’s guide to the exercise:
- Be mindful of the starting position: Make sure that you are comfortably seated on the floor and that your legs are extended forward. This gives a V shape. Do not stretch your limbs too much.
- Focus on the hand placements: Your hands must be placed behind your hips while the fingers are inwards and directed forward.
- Be careful while lifting your body: This is the most crucial state for reverse plank exercise in the case of beginners. Use your hands and heels to lift your body gently above the ground. Ensure that your lower body forms a straight line with your shoulders.
- Shorten the duration: As a beginner, do not overexert your body to hold the posture for more than a few seconds. 10 to 20 seconds is good enough for beginners. With practice and consistency, you will gradually master the skills to extend and hold your body in the air even for up to a minute.
Variations of the Reverse Plank
Once you have mastered the skills to perform reverse planks perfectly, it’s time to explore some variations of reverse planks:
- Reverse plank with leg lifting
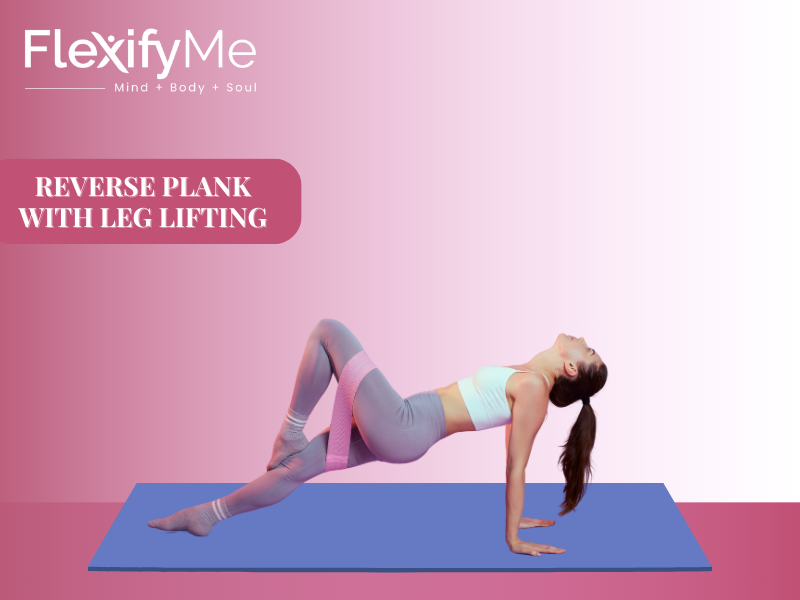
It is an advanced variation to the back plank exercise for those who wish to engage more muscle strength. It involves alternative leg movement patterns. However, keep your legs straight as you extend them forward each time.
- Reverse plank with single leg
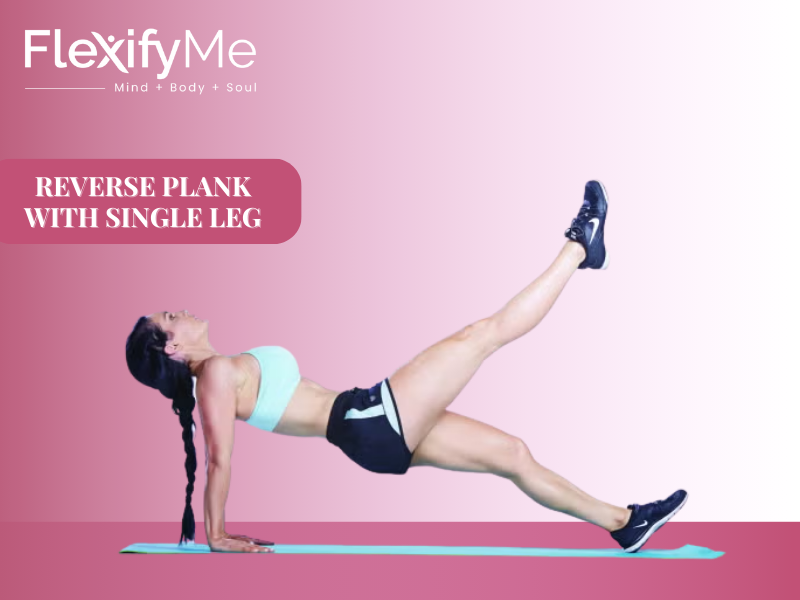
To perform this variation, you need to do reverse planks with one leg. The entire body weight is stabilised on one leg, which activates the stabiliser muscles in the body more than it does in the case of ordinary exercise.
- Reverse elbow planks:

This an easy variation to performing the reverse plank exercise, which might be challenging for a few. Consider using your elbows to balance body weight before you fully extend your arms.
- Reverse table-top posture

Here is another easy modification of the bacl plank exercise for beginners. In this case, your legs are bent and your feet are placed on the ground. At this state, your knees are at a 90-degree angle when raised. Your body is flat from your knees up to your shoulders, and it gives a tabletop appearance.
Common Mistakes to Avoid
Individuals with previous symptoms of aches or other complications should be mindful while conducting exercises at home. Speak to your physician, who can guide you on the extent of flexibility that you can experience. With proper exercise techniques and safety measures, you can seek the benefits of reverse planks without incurring any unwanted outcomes. Modifying the exercise somewhat to suit the needs of your body can help you draw its benefits while also ensuring that you do not have an adverse effect. Pay close attention to your body and how it responds to the exercise. In case of any discomfort, you can choose to discontinue the process.
To observe progress and build body strength, you need to include proper warm-up sessions and rest during the process. Your exercise program becomes most effective when there is a recovery period between every set. Allow your muscles to relax for at least 24 hours before you repeat the same process. Yet, there are some mistakes that we often end up with. Here are some common mistakes to avoid:
1. Hyperextension
While performing the reverse plank, be careful that you do not end up overextending your arms, knees or elbows. Of course, your limbs should be straight and firm, but not too stretched that they appear forced. You can use your back and gluteal muscles in the buttocks to take off the excess pressure on the knees.
2. Sagging
During the process, if you see that your body is sagging, then it is an indication to end the reverse plank. It’s better to hold the posture for a short duration than to perform it incorrectly for a longer time. As a beginner, you should aim for just a few seconds initially and later, with practice, you can extend it to a minute or so.
3. Neck and Head Posture
Do not tilt your head forward or even backwards while doing the reverse plank exercise. Instead, you should place it in such a way that your head and your neck are in alignment with each other and with the torso region to avoid spraining your neck.
Conclusion
As someone who is performing the steps of the reverse plank for the first time at home, you should speak to an expert and seek necessary tips on precautions. For instance, in case of any injury to the head, arms and wrist, it can prevent you from performing the move. Beginners should only perform this exercise as long as it’s comfortable or your body does not sag.
Reverse Plank Exercise FAQs
What are the benefits of doing Reverse Plank?
- Improves posture
- Strengthens the posterior chain (back, glutes, hamstrings)
- Enhances core stability
Reduces lower back discomfort - Opens up tight chest and shoulders
How do you perform a Reverse Plank step by step?
- Sit on the floor, legs extended.
- Place your hands behind you, fingers pointing toward your feet.
- Press into your hands and heels, lift your hips.
- Form a straight line from head to heels.
Hold while engaging core and glutes.
Which muscles does the Reverse Plank target?
- Core (abs and obliques)
- Glutes
- Hamstrings
- Lower back
Shoulders and triceps
Is Reverse Plank good for posture correction?
Yes! It counteracts slouching by strengthening the back and opening the chest, making it ideal for desk workers or anyone with rounded shoulders.
How long should I hold the Reverse Plank?
Start with 15–30 seconds, then increase up to 60 seconds or more as your strength and endurance improve.
Can beginners do the Reverse Plank?
Yes! Beginners can try:
- Bent-knee version
- Shorter holds
Using yoga blocks under hands for wrist support
Is Reverse Plank safe for back pain?
It can help strengthen weak back muscles, but avoid it if it causes pain.
Always consult a physiotherapist first—try an online physiotherapy consultation for safe guidance.
What are common mistakes in Reverse Plank?
- Letting hips sag
- Overarching the back
- Not engaging core or glutes
- Looking too far back (strain on neck)
How often should I include Reverse Plank in my workouts?
Aim for 2–3 times per week as part of a full-body or core routine for maximum benefit.
Book a free demo of our online yoga classes or connect with a certified physiotherapist for posture-focused training.