The Lotus position is one of the most recognised Yoga poses. You’ll see it in many meditation images and in works of art from ancient history. Many people new to Yoga want to achieve the beauty and elegance of this pose. However, the Lotus position serves a much greater purpose than just looking good; it is an incredibly beneficial tool for practising meditation and mindfulness.
You will learn about the pose itself, its importance, and its many physical and mental health benefits. You’ll also learn about specific preparatory poses that can help get your hips ready for the Lotus position, as well as detailed, step-by-step instructions on how to safely get into, stay in, and come out of the Lotus position.
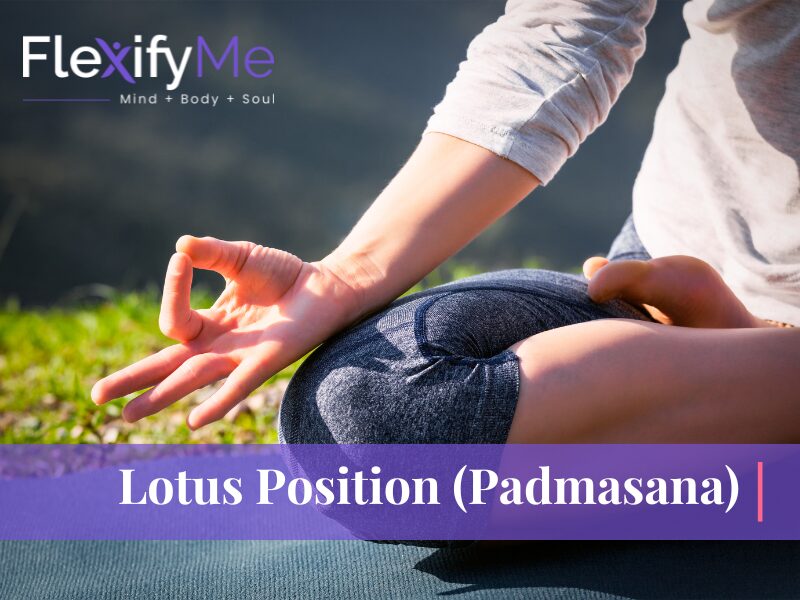
What is the Lotus Position (Padmasana)?
The Lotus position, or Padmasana, is a seated, cross-legged pose where each foot is positioned on the opposite thigh, while keeping your spine straight, with your hands resting upon your knees. This creates a steady foundation for practising meditation.
Quick Facts About Lotus Position
- Sanskrit Name: Padmasana (pad-MAHS-anna)
- Meaning: Padma = Lotus, Asana = Pose
- Difficulty Level: Advanced
- Target Areas: Hips, knees, ankles, lower back
- Hold Time: 1-5 minutes (beginners), 10-60 minutes (advanced)
- Preparation Time: 3-12 months for most practitioners
Sanskrit Meaning and Pronunciation
Padmasana has a dual nature based on the Sanskrit words. “Padma” is a lotus flower, and “asana” means pose. The lotus flower, as found in Eastern philosophy, is representative of spirituality because the flower grows from muddy waters to become pure and clean.
Historical Significance
The lotus position has been documented in ancient texts thousands of years ago, and the oldest Buddha Statues depict him seated in Padmasana, also showing the sitting position of the Hindu deities as evidence of its spiritual significance.
Physical and Mental Benefits of Lotus Position
Research and centuries of yogic tradition highlight numerous benefits of regular lotus position practice. However, these benefits only manifest when the pose is practiced correctly and without force or pain.
Physical Benefits
1. Improves Hip Flexibility and Mobility
Lotus position systematically stretches the hip flexors, external rotators, and adductor muscles. Regular practice can increase hip range of motion by 15-20% over three months, according to flexibility studies on yoga practitioners. This improved mobility supports better movement patterns in daily activities and reduces lower back compensation.
2. Strengthens Core and Postural Muscles
Maintaining an upright spine in lotus engages the transverse abdominis, multifidus, and erector spinae muscles. These deep core stabilizers build endurance over time, improving your overall posture even when you’re not practicing yoga.
3. Enhances Ankle and Knee Health
When practiced correctly (with movement coming from the hips), lotus position gently mobilizes the ankle joints through their full range of motion. The stable bent-knee position can also strengthen supporting ligaments and tendons, though this must be approached gradually.
4. Improves Circulation in Lower Body
The crossed-leg position temporarily restricts blood flow to the legs, then causes increased circulation when you release the pose. This pumping action can help reduce swelling and improve vascular health over time.
5. Supports Digestive Function
The gentle compression of the lower abdomen in lotus position can stimulate digestive organs and support healthy bowel function. Traditional yogic texts claim this benefit, though scientific research remains limited.
6. Reduces Lower Back Strain
Unlike slouched sitting positions, lotus position naturally aligns the spine in its neutral curves when hips are sufficiently flexible. This alignment reduces compressive forces on lumbar discs and can alleviate chronic lower back discomfort for some practitioners.
7. Increases Joint Awareness and Proprioception
The complex positioning of lotus develops greater awareness of how your joints move and where they are in space. This enhanced proprioception can improve overall body awareness and coordination.
8. Builds Mental Stamina for Extended Meditation
The stable base of lotus allows you to sit for longer meditation sessions without constantly adjusting your position, supporting deeper contemplative practices.
Mental and Spiritual Benefits
1. Promotes Mental Stillness and Focus
The stable, symmetrical nature of lotus position creates a grounded feeling that many practitioners find conducive to concentration. Research on meditation postures suggests that stable seated positions correlate with reduced mind-wandering during practice.
2. Balances Energy Flow
According to yogic philosophy, lotus position facilitates the flow of prana (life force energy) up the spine through the seven chakras. The grounded quality of the pose with both feet elevated creates an energetic circuit that supports meditation and breathwork.
3. Reduces Stress and Anxiety
Like other yoga poses, lotus position activates the parasympathetic nervous system when practiced with calm breathing. A 2019 study in the Journal of Bodywork and Movement Therapies found that regular practice of seated yoga postures reduced cortisol levels and self-reported stress.
4. Enhances Breath Control
The upright spine alignment in lotus creates optimal conditions for full diaphragmatic breathing. Many pranayama techniques are traditionally practiced in this position because it allows unrestricted breath flow.
5. Deepens Meditative States
Traditional texts claim that lotus position specifically supports samadhi (meditative absorption). While scientific evidence for this specific claim is limited, the pose’s physical stability does reduce bodily distractions during meditation.
6. Cultivates Patience and Self-Awareness
Working toward lotus position over months or years teaches valuable lessons about accepting your body’s current capabilities while working gradually toward goals. This mirrors broader yogic principles of self-study and non-attachment.
7. Creates Symbolic Connection to Practice
For many practitioners, sitting in lotus creates a felt connection to thousands of years of yogic tradition and millions of practitioners worldwide, adding meaningful context to meditation sessions.
Prerequisites: Are You Ready for the Lotus Position?
Not everybody is ready for Lotus immediately, and assessing readiness is essential for injury prevention.
Self-Assessment Checklist
Before working toward Padmasana, evaluate your readiness. Can you comfortably sit for 10 minutes with your legs bent at the knees? Are you able to rotate your hip joints outward without excessive effort?
If you said yes to these questions, you can start working towards the lotus position. If not, focus on preparatory poses first. Building flexibility prevents injuries.
Contraindications: When NOT to Practice Lotus Position
Absolute Contraindications (Do Not Practice):
- Recent or chronic knee injuries (ACL/MCL tears, meniscus damage)
- Recent hip or ankle injuries or surgery
- Acute sciatica or sciatic nerve pain
- Pregnancy (especially second and third trimesters)
- Hip replacement or other joint replacement surgery
Relative Contraindications (Proceed with Extreme Caution):
- Arthritis in hips, knees, or ankles
- Previous knee or hip surgery (consult your surgeon first)
- Chronic hip pain or impingement
- SI joint dysfunction
- Hypermobility disorders (EDS, joint hypermobility syndrome)
When in Doubt: Consult with a qualified yoga therapist, physical therapist, or orthopedic specialist before attempting lotus position.
Essential Preparatory Poses for Lotus Position
Preparatory poses condition the hips and joints, making lotus practice safer and more accessible.
Butterfly Pose (Baddha Konasana)
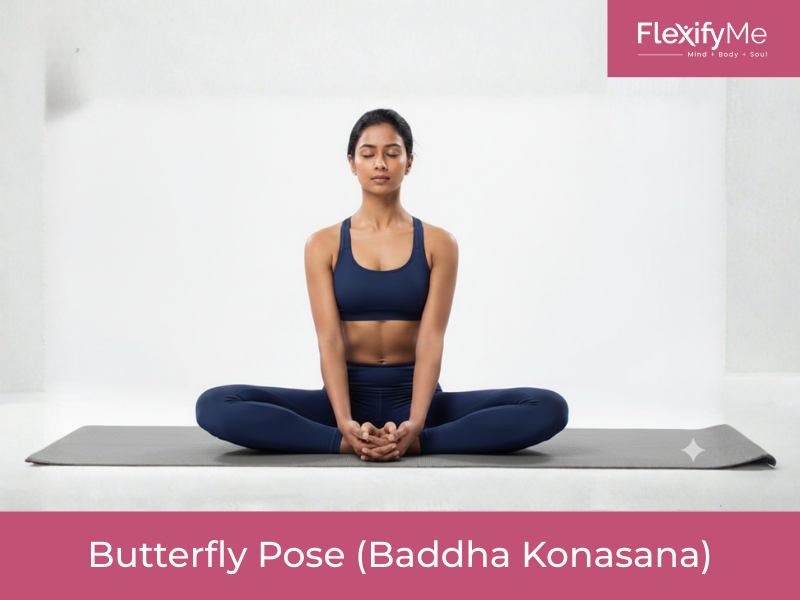
The butterfly pose is perfect for preparing your hips. To perform this pose, sit with the soles of your feet together and allow your knees to fall to the sides while holding your feet with your hands. Press down gently on the knees.
Pigeon Pose (Eka Pada Rajakapotasana)
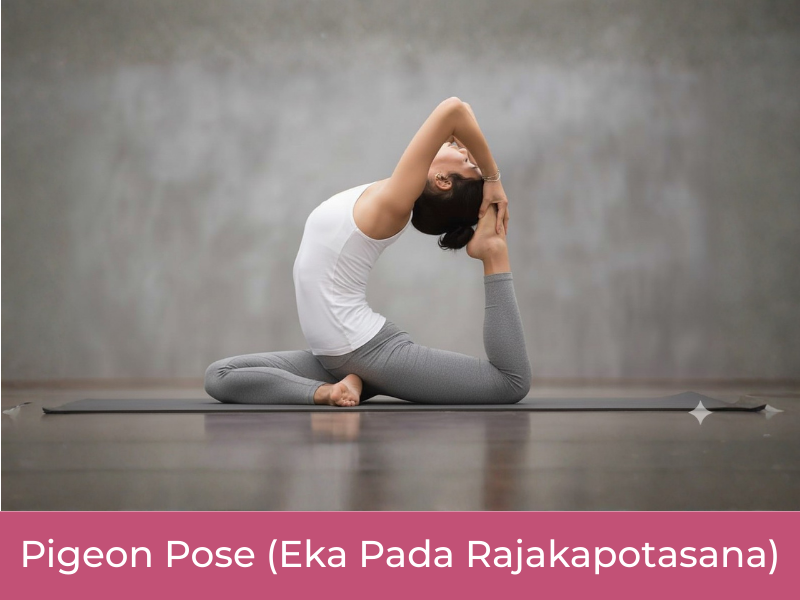
The pigeon pose will deeply stretch the muscles in your hips. To perform this pose, you will start on your hands and knees. Bring your right knee forward and extend your left leg back. As you are doing this, you should lower your hips toward the ground until you feel a good stretch in your left hip.
Fire Log Pose (Agnistambhasana)
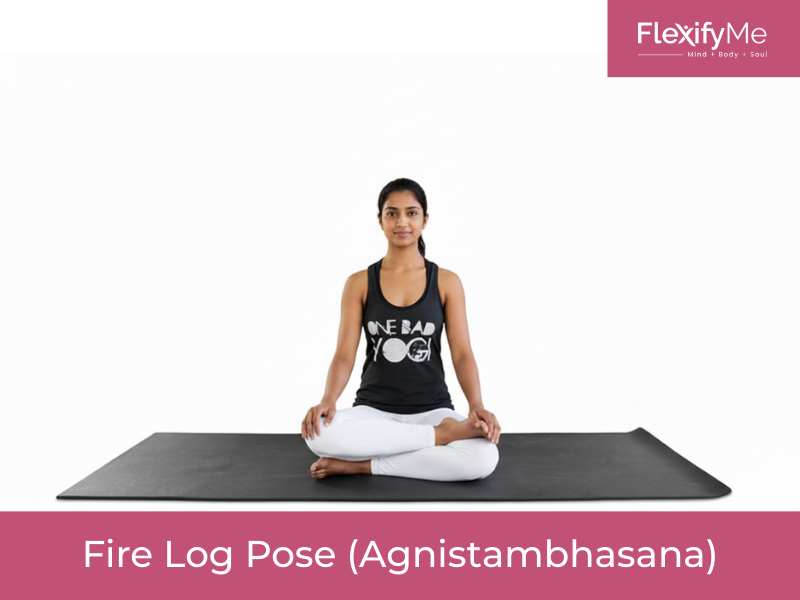
The firelog pose will open your hips very deeply. To perform this pose, you will sit with your legs extended. Bend your right leg, and position your right shin on the mat parallel to the front of the mat. Stack your left leg on top of your right leg so that your ankles are directly above your knees.
Weekly Practice Schedule
As a beginner, the recommended routine for performing these three poses is:
- Butterfly pose: Daily for two minutes each session
- Pigeon pose: Four sessions per week, holding each side for two minutes.
- Fire log pose: Three times weekly. Hold each side for 1-2 minutes.
How to Do Lotus Position: Step-by-Step Instructions
Breaking the lotus position into stages makes it easier to practise safely and progressively.
Stage 1: Setting Up Your Foundation
Sit on your mat with legs straight. Sit on a folded blanket if your hips are tight. This lifts your hips above your knees. It makes the pose easier. Sit upright with a straight spine.
Stage 2: Entering Half Lotus
Bend your right leg and pull your right foot toward you so that you can hold on to the outside of your right ankle with both hands. You are going to gently place your right foot up on your left thigh with the sole of the foot facing upward. Bend your left leg while keeping your left foot flat against the floor.
Stage 3: Completing Full Lotus Position
When the half lotus position is comfortable, slowly bring your left foot off the floor and up toward your body, while holding on with your hands to the outside of your left ankle with both hands, and gently place it on your right thigh with the sole of the left foot facing up. In this case, both feet rest on opposite thighs.
Stage 4: Holding the Pose
Place your hands on your knees once in position. You can make chin mudra or rest your palms down. Lengthen your spine upward. Relax your shoulders. Close your eyes or gaze softly. Breathe deeply and evenly.
Stage 5: Safely Exiting
To exit the lotus position, carefully remove your top foot from your thigh, place it gently on the floor, and release your bottom foot to extend both legs straight ahead naturally.
Ready to Master Lotus Position Safely?
Join our expert-led online yoga classes and get personalized guidance on your form, hip flexibility training, and step-by-step progression.
Common Mistakes and How to Avoid Them
Being aware of common errors helps protect the knees and hips during lotus practice.
Mistake #1: Forcing the Knee

One of the biggest mistakes made is forcing the knee into the Lotus Position; the knee only bends forward and slightly backward; twisting outward (sideways) places unnecessary pressure on the injured knee area.
Mistake #2: Skipping Warm-Up
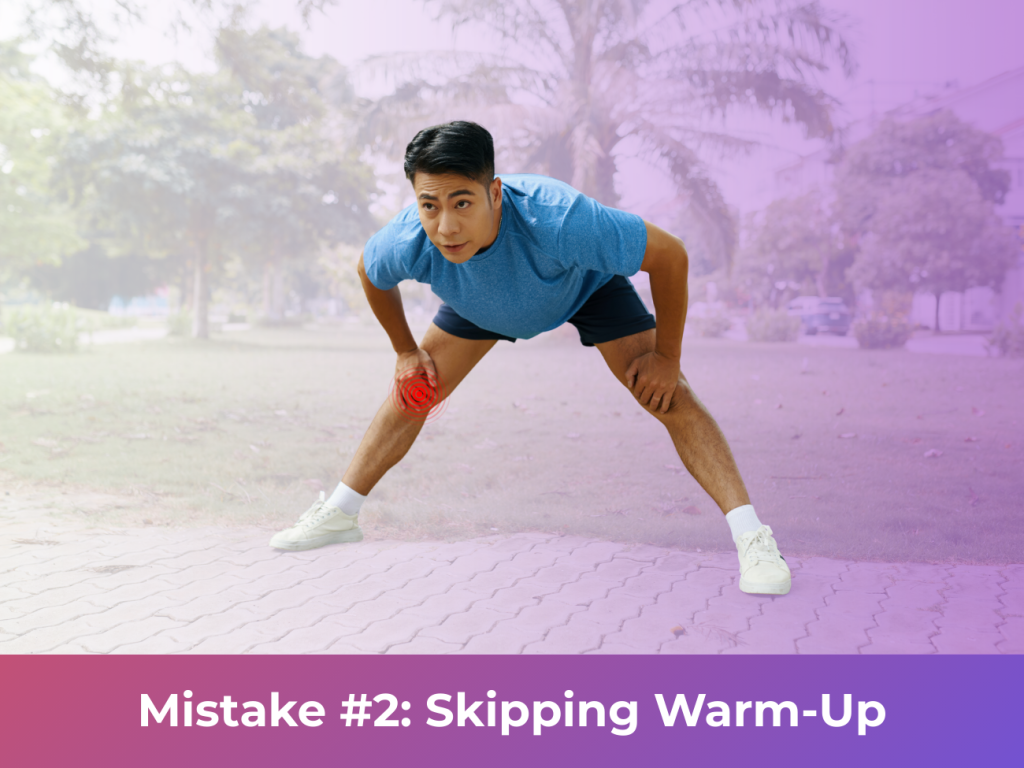
Most of the time, beginners attempt the Lotus Position without properly warming up, which increases the risk of injury because a proper warm-up allows the body to open gradually.
Mistake #3: Poor Posture
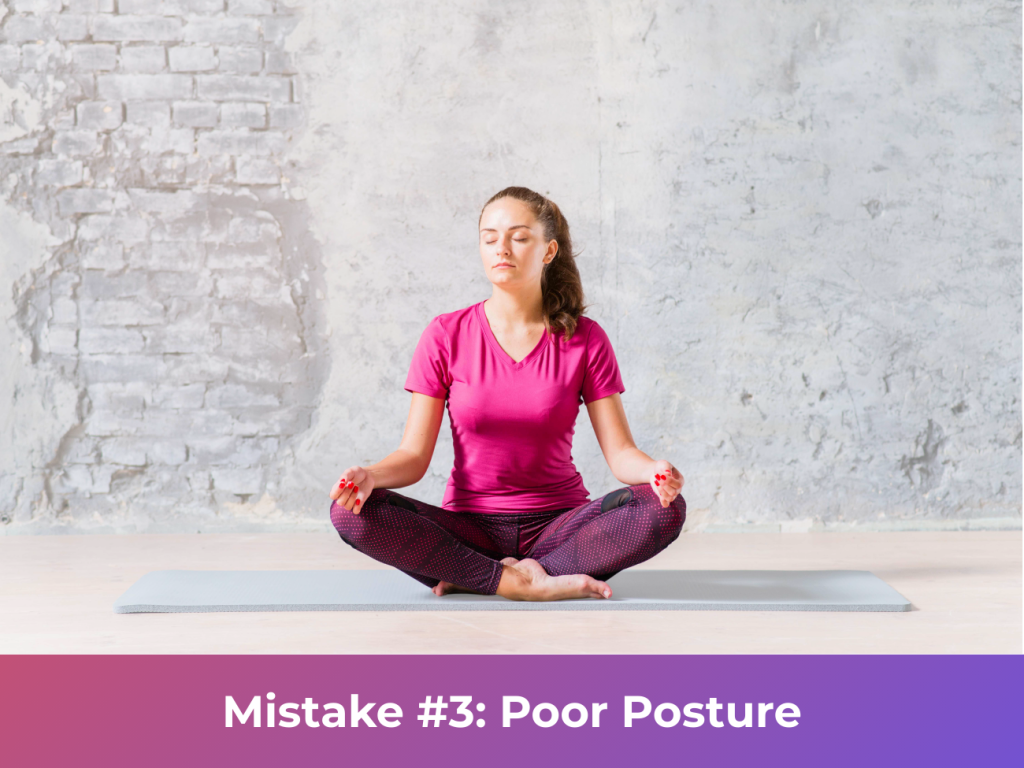
Most people with poor posture will sit in the lotus position but slouch. This action is inconsistent with the rationale for this stretch. Maintain proper spinal alignment by maintaining good posture.
Mistake #4: Holding Too Long

A common mistake among beginner practitioners of the Lotus Position is trying to hold the pose longer than necessary. Start by holding for up to 30 seconds, and gradually build your endurance over several weeks.
Modifications for Different Body Types and Levels
Not all bodies are built the same, and lotus position requires significant anatomical variation. These modifications ensure everyone can work toward appropriate versions of the pose.
Level 1: Complete Beginners and Those with Limited Flexibility
Easy Pose (Sukhasana)
This is the most accessible cross-legged position and offers many of the same benefits as lotus.
How to Practice:
- Sit on a folded blanket or cushion (elevated 2-4 inches)
- Cross your shins with each foot below the opposite knee
- Allow a small space between your pelvis and feet
- Keep your spine upright
Benefits: Gentle hip opening, stable meditation seat, sustainable for long periods
Use This If:
- You’re new to yoga or seated meditation
- Your knees are more than 6 inches above the floor in butterfly pose
- You have knee injuries or concerns
- You’re over 50 and beginning flexibility work
Level 2: Developing Flexibility
Half Lotus (Ardha Padmasana)
Half lotus provides most benefits of full lotus with significantly less demand on your joints.
How to Practice:
- Sit on a cushion with your spine upright
- Bend your right leg and place your right foot on your left thigh
- Your left foot remains under your right thigh or shin
- Switch sides after your hold time
Benefits: Strong hip opening, very stable base, excellent meditation seat, accessible to most practitioners with consistent practice
Use This If:
- You can comfortably hold butterfly pose with knees near the floor
- Your hip flexibility is developing but not quite ready for full lotus
- You want the benefits of lotus without the intensity
- You’re building toward full lotus over time
Important: Many experienced meditators use half lotus exclusively and never work toward full lotus. This is completely valid and appropriate.
Level 3: Progressing Toward Full Lotus
Supported Lotus
If you can achieve the shape of full lotus but need support.
How to Practice:
- Enter full lotus position
- Place yoga blocks, folded blankets, or cushions under each knee
- Use props that fill the gap between your knees and the floor
- Gradually reduce prop height as flexibility increases
Benefits: Allows proper alignment while building tolerance, reduces strain, makes longer holds possible
Use This If:
- Your knees are 1-4 inches from the floor in full lotus
- You’re working on extending hold times
- You want to practice full lotus for meditation but need support
Level 4: Advanced Practitioners
Full Lotus (Padmasana)
The complete expression of the pose with both feet on opposite thighs.
How to Practice: Follow the step-by-step instructions in the main section. Your knees should rest on or very close to the floor without forcing.
Benefits: Maximum stability, optimal energy flow, traditional meditation seat
Use This If:
- Your knees rest at or near the floor comfortably
- You have no knee or hip pain in the position
- You can hold the pose for 5+ minutes with good alignment
Modifications for Specific Needs
For Individuals with Larger Bodies:
Lotus position can be particularly challenging when carrying extra weight around the midsection.
Modifications:
- Use higher cushions (4-6 inches) to create more space
- Practice Burmese position (both feet on the floor, one in front of the other)
- Use easy pose with additional props
- Focus on hip-opening benefits without worrying about the full expression
For Seniors (60+):
Age-related changes in connective tissue flexibility are normal and expected.
Modifications:
- Always use props for elevation
- Accept that full lotus may not be accessible or appropriate
- Focus on easy pose and gentle hip openers
- Prioritize comfort and spinal alignment over achieving a specific leg position
- Consider chair-seated meditation as an equally valid option
For People with Long Femurs:
Body proportions significantly affect your ability to achieve lotus.
Modifications:
- Use higher cushions to create a steeper angle at the hips
- Accept that half lotus may be your fullest expression
- Focus on internal rotation in Pigeon pose
- Consider that your body structure may make full lotus anatomically challenging
For Hypermobile Individuals:
If you have hypermobility or joint hypermobility syndrome, you may achieve lotus easily but risk injury.
Modifications:
- Focus on STRENGTH rather than flexibility
- Don’t sink into end-range positions
- Use muscular engagement to stabilize joints
- Work with a qualified yoga therapist
- Avoid long holds that create joint instability
Breathwork and Meditation in Lotus Position
One of lotus position’s primary purposes is creating a stable, comfortable seat for pranayama (breathing practices) and meditation. Once you can hold the pose comfortably, these techniques deepen your practice.
Best Pranayama Techniques for Lotus Position
1. Diaphragmatic Breathing (Belly Breathing)
The foundation of all pranayama, this technique teaches proper breath mechanics.
How to Practice:
- Sit comfortably in lotus or half lotus
- Place one hand on your belly, one on your chest
- Inhale deeply, allowing your belly to expand (hand rises)
- Your chest should remain relatively still
- Exhale completely, belly contracts
- Continue for 5-10 minutes
Benefits: Activates parasympathetic nervous system, reduces stress, increases oxygen intake
2. Ujjayi Breath (Ocean Breath)
A traditional yoga breathing technique that creates an audible sound.
How to Practice:
- Sit in lotus with spine upright
- Slightly constrict the back of your throat
- Breathe in and out through your nose
- Create a soft “ha” or ocean-wave sound
- Keep the breath slow and steady
- Practice for 5-15 minutes
Benefits: Builds heat, enhances focus, regulates breath rhythm
3. Alternate Nostril Breathing (Nadi Shodhana)
This balancing technique is traditionally practiced in lotus position.
How to Practice:
- Sit in lotus with your spine straight
- Rest your left hand on your left knee
- Bring your right hand to your face
- Close your right nostril with your right thumb
- Inhale through the left nostril (count of 4)
- Close left nostril with ring finger, release right nostril
- Exhale through the right nostril (count of 4)
- Inhale through the right nostril
- Switch and exhale through the left
- Continue for 5-10 minutes
Benefits: Balances left and right brain hemispheres, calms nervous system, enhances mental clarity
4. Box Breathing (Square Breathing)
A powerful technique used by Navy SEALs and meditation practitioners alike.
How to Practice:
- Sit in lotus position
- Inhale for 4 counts
- Hold (retain) for 4 counts
- Exhale for 4 counts
- Hold (empty) for 4 counts
- Repeat for 5-10 minutes
Benefits: Reduces anxiety, improves focus, regulates autonomic nervous system
5. Extended Exhale Breathing
Particularly effective for stress reduction and preparing for sleep.
How to Practice:
- Sit comfortably in lotus
- Inhale for 4 counts
- Exhale for 6-8 counts (longer than inhale)
- Continue for 5-10 minutes
Benefits: Activates parasympathetic response, lowers heart rate, promotes relaxation
Meditation Techniques in Lotus Position
Mindfulness Meditation: Focus on your breath as it enters and exits your nostrils. When your mind wanders, gently return attention to the breath. The stability of lotus supports sustained attention.
Body Scan Meditation: Systematically bring awareness to each part of your body from feet to head, noticing sensations without judgment. Lotus provides a stable base that doesn’t require constant repositioning.
Mantra Meditation: Silently repeat a word or phrase (such as “Om” or “peace”) in rhythm with your breath. The groundedness of lotus enhances the vibrational quality of mantra practice.
Chakra Meditation: Traditional texts suggest lotus position specifically supports energy flow through the seven chakras. Focus on each energy center from root to crown.
Morning vs. Evening Practice
Morning Lotus Practice:
Benefits:
- Sets positive intention for the day
- Mind is naturally quieter after sleep
- Creates sustainable daily habit
- Energizing breathwork is most effective
Best Techniques:
- Ujjayi breath (energizing)
- Brief holds (3-5 minutes)
- Active meditation or visualization
- Gentle hip openers beforehand
Evening Lotus Practice:
Benefits:
- Body is naturally more flexible
- Releases accumulated stress
- Prepares for restful sleep
- Longer holds are more comfortable
Best Techniques:
- Extended exhale breathing (calming)
- Longer holds (10-20 minutes)
- Body scan or mindfulness meditation
- Gentle stretching afterward
Creating a Consistent Practice
Start Small: Begin with just 5 minutes of seated practice daily. Consistency beats duration.
Same Time, Same Place: Your brain associates specific environments with specific activities. Create a dedicated meditation space and practice at the same time each day.
Pair with Existing Habits: “After I drink my morning coffee, I’ll sit in lotus for 5 minutes.” This habit-stacking technique increases adherence.
Track Your Practice: Keep a simple log of your daily practice. Seeing your consistency over weeks and months provides motivation.
Props and Equipment Guide for Lotus Position
The right props make lotus position more accessible, comfortable, and sustainable. Here’s what to consider.
Essential Props
1. Meditation Cushion (Zafu)
What It Is: A round, firm cushion specifically designed for seated meditation, typically 5-8 inches high.
Why You Need It: Elevating your hips above your knees reduces lower back strain and makes hip external rotation much easier. This is the single most important prop for lotus practice.
How to Choose:
- Height: Taller people or those with tight hips need higher cushions (6-8 inches)
- Firmness: Firmer cushions provide better support for longer sits
- Fill: Buckwheat hulls conform to your body; kapok is lighter and firmer
Recommended: Start with a 6-inch zafu and adjust from there.
2. Yoga Mat
What It Is: A cushioned, non-slip surface for practice.
Why You Need It: Provides traction and light cushioning for your knees and ankles.
How to Choose:
- Thickness: 5-6mm for balance between cushioning and stability
- Material: Natural rubber or TPE for eco-friendly options
- Texture: Enough grip to prevent sliding
3. Yoga Blocks (Set of 2)
What They’re For: Supporting elevated knees, providing height variation, and assisting with preparatory poses.
Why You Need Them: When your knees don’t reach the floor in lotus, blocks placed underneath prevent strain and allow relaxation.
How to Choose:
- Material: Foam blocks are lighter; cork is more sustainable and stable
- Size: Standard blocks (9″ x 6″ x 4″) work for most people
4. Yoga Blanket
What It’s For: Creating custom height, cushioning bony areas, and supporting various body parts.
Why You Need It: Blankets are incredibly versatile—fold them to create any height you need, wrap them around tight ankles, or use them for padding.
How to Choose:
- Material: Cotton or wool blend
- Size: Standard yoga blanket (60″ x 80″)
- Thickness: Medium weight offers best versatility
Optional but Helpful Props
5. Yoga Strap
Use: Assists with preparatory stretches like seated forward folds when you can’t reach your feet.
6. Bolster
Use: Supports your torso during reclined hip openers and provides higher elevation than zafu when needed.
7. Eye Pillow
Use: Blocks light during meditation, provides gentle pressure that calms nervous system.
8. Meditation Bench (Seiza Bench)
Use: Alternative to lotus for those whose anatomy doesn’t support cross-legged positions. Allows kneeling with reduced strain on knees and ankles.
Setting Up Your Meditation Space
Optimal Setup:
- Place your zafu or folded blanket on your yoga mat
- Have blocks nearby but not in the way
- Create a visually calm environment
- Ensure adequate ventilation and comfortable temperature
- Minimize external distractions (turn off phone notifications)
Height Progression:
- Beginner (tight hips): 6-8 inches elevation
- Intermediate (moderate flexibility): 3-5 inches elevation
- Advanced (good flexibility): 1-3 inches elevation or flat on mat
Safety Guidelines and Injury Prevention
Practicing lotus position safely requires awareness of your body’s signals and respect for its current capabilities.
Warning Signs to Stop Immediately
Sharp Pain: Any stabbing, pinching, or acute pain in your knees, hips, or ankles means exit the pose immediately. Sharp pain indicates potential tissue damage.
Numbness or Tingling: Nerve compression from the crossed-leg position can cause these sensations. While brief tingling after releasing the pose is normal, persistent numbness or tingling during the pose suggests excessive compression.
Feeling of “Locking” or “Catching”: If your knee or hip feels like it’s catching, clicking loudly, or locking in place, stop. This may indicate meniscus issues or joint problems.
Burning Sensation: A burning feeling, especially near joints, often indicates inflammation or excessive strain.
Pain That Increases: Sensation should remain steady or gradually decrease as you breathe and relax. Increasing pain means your body is protesting—listen to it.
Pain That Persists After Practice: If you feel discomfort several hours after releasing the pose or the next day, you’ve pushed too far.
Safe Practice Guidelines
The 80% Rule: Never push beyond 80% of your maximum range of motion. Leave a 20% buffer zone to prevent overstretching and injury.
Breath as a Guide: If you cannot breathe deeply and smoothly, the position is too intense. Your breath should remain calm throughout.
Progressive Overload: Increase duration by no more than 30 seconds per week and intensity very gradually.
Rest Days: Take at least 1-2 days per week off from lotus practice to allow tissues to recover and adapt.
Warm-Up Always: Never attempt lotus without at least 5 minutes of gentle preparatory movement.
Both Sides Equally: Alternate which leg you place first to prevent imbalances.
Injury Recovery Protocol
If you experience pain or injury from lotus practice:
Immediate Actions (First 24-48 Hours):
- Stop all lotus and half-lotus practice
- Apply ice to painful area (20 minutes on, 40 minutes off)
- Avoid activities that aggravate the pain
- Take anti-inflammatory medication if appropriate for you
- Elevate the affected area when possible
Days 3-7:
- Gentle range-of-motion exercises (no stretching yet)
- Continue ice if swelling persists
- Consider seeing a healthcare professional if pain doesn’t improve
Week 2+:
- Gradual return to gentle preparatory poses only
- Avoid lotus position until completely pain-free for one week
- When returning, use modifications and shorter hold times
- If pain returns, seek professional evaluation
When to Seek Medical Attention
See a healthcare provider if:
- Pain persists beyond one week
- You hear or feel a “pop” in your knee or hip
- Significant swelling occurs
- You cannot bear weight on the affected leg
- Pain interferes with daily activities
- Numbness or tingling persists after practice
Long-Term Joint Health
Supporting Lotus Practice:
- Maintain overall flexibility through varied movement
- Strengthen hip muscles (not just stretch them)
- Practice good posture throughout your day
- Stay hydrated to support joint lubrication
- Include Omega-3 fatty acids in your diet for joint health
- Avoid sitting in lotus for hours when you’re not ready
Special Populations
If You’re Over 50: Joint flexibility naturally decreases with age. Be patient with yourself, use more props, and consider that half lotus or easy pose might be more appropriate.
If You’re Pregnant: Lotus position is generally not recommended during second and third trimesters due to pressure on the abdomen and potential circulation restriction.
If You Have Arthritis: Consult with your rheumatologist before attempting lotus. You may need to avoid it entirely or practice only gentle versions with significant modification.
Frequently Asked Questions
1. How long does it take to master the lotus position?
A: The time varies for each person. Some people achieve the lotus position in weeks. Others need months or years. Your hip structure, flexibility and practice frequency affect progress. Focus on safe progress, not speed.
2.Can everyone eventually achieve the lotus position?
A: No. The anatomy of the hips is different from person to person. Some people have naturally deeper hip sockets than others do, and so they have a limited range of motion in their hips as far as external rotation goes.
3. Is the lotus position required for meditation?
A: No. The lotus position is not required for meditation. You can sit in any way that you find to be comfortable. Cross-legged and even a simple seated position will work for meditation. The most important thing is to keep your spine straight while meditating.
4. Should I feel pain when I sit in the lotus position?
A: No. When you are seated in the lotus position, you should not experience any pain. Some people may feel mild stretching while sitting in the lotus position, but it should not be sharp or shooting pain.
Q: Can I practise the lotus position with tight hips?
A: Yes. You can practice the lotus position even if you have tight hips, but you should always begin with preparatory poses, focusing on hip flexibility for several weeks or months. Remember to be patient with your body.
5. How often should I practise the lotus position?
A: Practise the lotus position 3-5 times weekly as a beginner. Daily practice is fine once you’re comfortable. Always listen to your body. Rest if you feel any strain.
6. What if one hip is tighter than the other?
A: Most people have one tighter hip. This is completely normal. Spend extra time stretching your tighter side. Alternate which leg goes on top in half lotus. This builds balanced flexibility over time.
7.Will my knees be harmed when practising the lotus position?
A: If you practice lotus without the proper training and slowly, you run the risk of injuring your knees. By taking the time to prepare properly, you will reduce this risk. Always remember to pay attention to any discomfort you may experience while practising.
8. Is the half lotus the best position to use for meditation?
A: Half lotus is an excellent position from a stability standpoint; as such, many experienced meditators choose to utilise half lotus, but there is no need to rush to learning full lotus.
9. Should I use props when practising the lotus position?
A: Yes, using props like blocks and blankets for support is very beneficial for beginning yoga practitioners. Elevating your hips will make it easier to maintain proper lotus posture.

